本教學如何編寫 Android 平台的 Hello World 程序。 Android 是一個開放源碼的手機平台。除了使用純文字編輯器外,大部份用家也會使用 Eclipse 和 ADT 編寫 Android 程序。
編寫 Android 平台的 Hello World 程序
-
在開始編寫 Android 平台的 Hello World 程序前,請確保系統已經安裝 JAVA SDK、Android SDK、Eclipse 和 ADT 。而且已經設定了相關的系統環境。
-
打開 Eclipse。
-
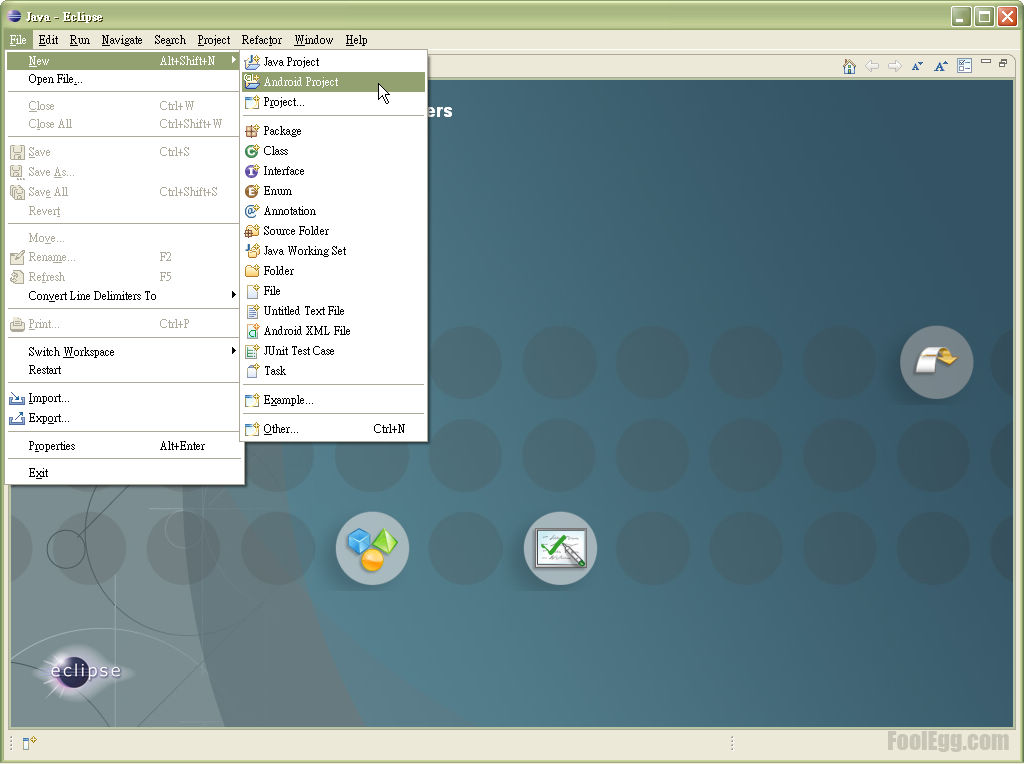
在選單內選擇「File」,之後在「New (Alt+Shift+N)」內選擇「Android Project」。
-
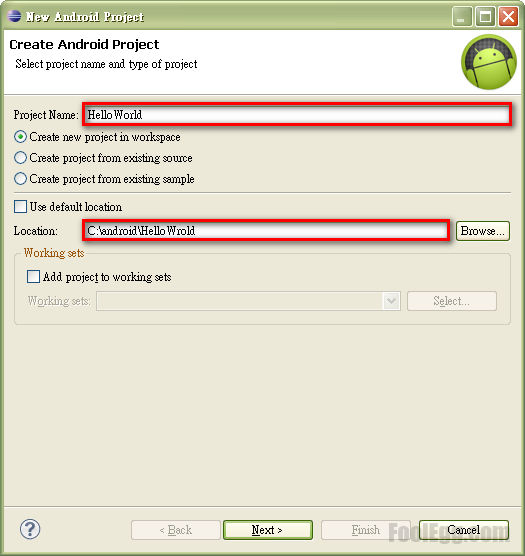
在「Project Name」內輸入專案的名稱,例如︰「HelloWorld」。而在「Location」內可以選擇存放的位置。完成設定後按「Next >」繼續下一步。
-
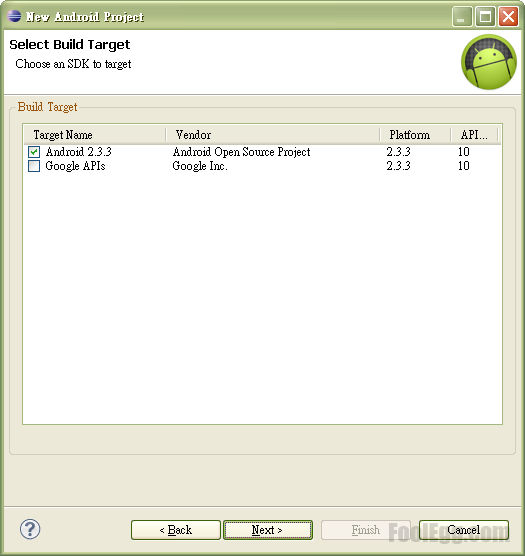
在「Build Target」內選擇 Android 程序的運行版本。如果不知道選擇哪一個,可選擇「Android 2.3.x」。選擇後按「Next >」繼續下一步。
-
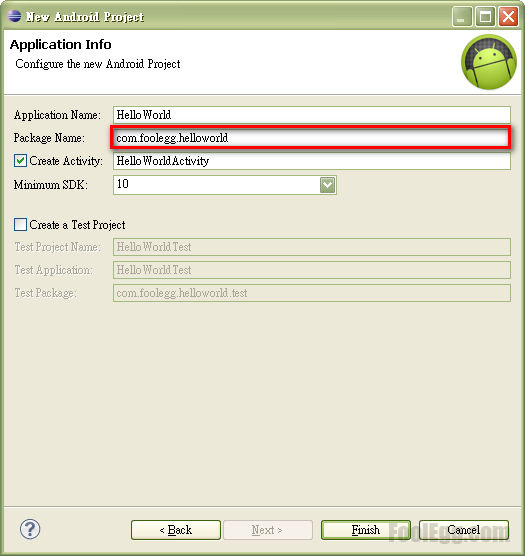
之後設定 Android 程序。更改「Package Name」內的「your.package.namespace」數值。例如「com.foolegg.helloworld」。「Package Name」必須至少由兩個部分所組成,即是「partone.parttwo」。填寫後按「Finish」建立 Android 程序的目錄和基本檔案。
-
我們看看左邊的「Package Explorer」。新的 Android 專案預設會包含一些基本的文件,在「src」資料夾內會看到「Package Name」,我們可以當它當作資料夾。「Package Name」內有一個
.java檔案。而「res」內包含不同的資源,包括布局文件、格式資源文件和顏色資源文件等。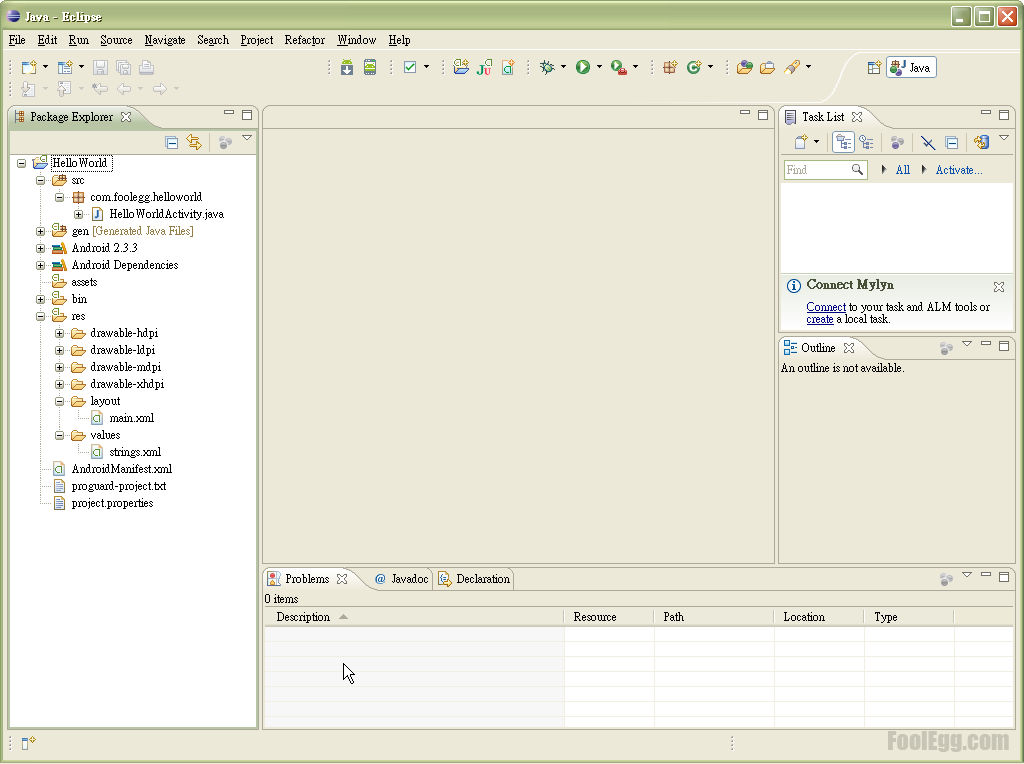
-
點擊並編輯「HelloWorldActivity.java」。將下面的內容取代原來的內容。
 1
 2
 3
 4
 5
 6
 7
 8
 9
10
11
12
13
14
15
16
17
18
19
20
21
22
23
24
25
26
27
28
29
30
31
32
33
34
package com.foolegg.helloworld; import android.app.Activity; import android.os.Bundle; import android.widget.TextView; import android.widget.Button; import android.view.View; import android.view.View.OnClickListener; public class HelloWorldActivity extends Activity { /** Called when the activity is first created. */ @Override public void onCreate(Bundle savedInstanceState) { super.onCreate(savedInstanceState); setContentView(R.layout.main); final Button btn1 = (Button) findViewById(R.id.button1); btn1.setOnClickListener(new OnClickListener() { public void onClick(final View v) { final TextView tvi = (TextView) findViewById(R.id.tv); tvi.setText(R.string.hello); } }); final Button btn2 = (Button) findViewById(R.id.button2); btn2.setOnClickListener(new OnClickListener() { public void onClick(final View v) { final TextView tvi = (TextView) findViewById(R.id.tv); tvi.setText(Date: + new java.util.Date()); } }); } } -
點擊並編輯「main.xml」。將下面的內容取代原來的內容。
 1
 2
 3
 4
 5
 6
 7
 8
 9
10
11
12
13
14
15
16
17
18
19
20
21
22
23
24
25
<?xml version="1.0" encoding="utf-8"?> <linearlayout xmlns:android="http://schemas.android.com/apk/res/android" android:layout_width="fill_parent" android:layout_height="fill_parent" android:orientation="vertical"> <textview android:id="@+id/tv" android:layout_width="fill_parent" android:layout_height="wrap_content" android:text="@string/hello"></textview> <button android:id="@+id/button1" android:layout_width="wrap_content" android:layout_height="wrap_content" android:text="@string/button1Text"></button> <button android:id="@+id/button2" android:layout_width="wrap_content" android:layout_height="wrap_content" android:text="@string/button2Text"></button> </linearlayout> -
點擊並編輯「strings.xml」。將下面的內容取代原來的內容。
|
|
-
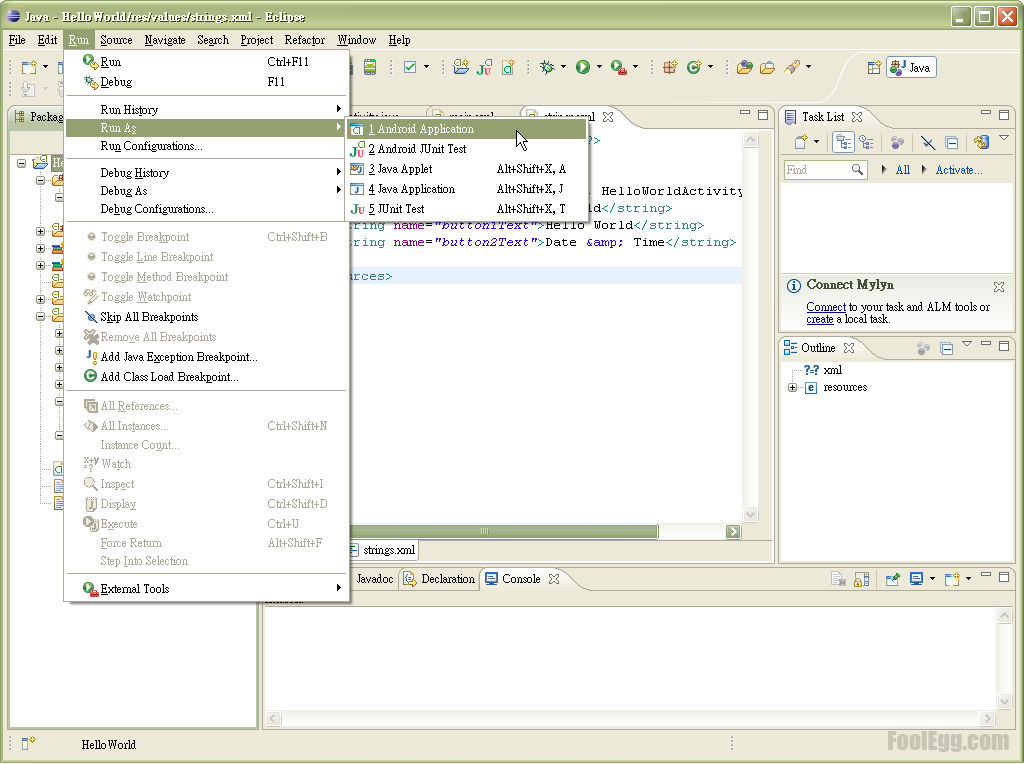
在主選單中選擇「Run」。然後選擇「Run As」內的「1 Android Application」。
-
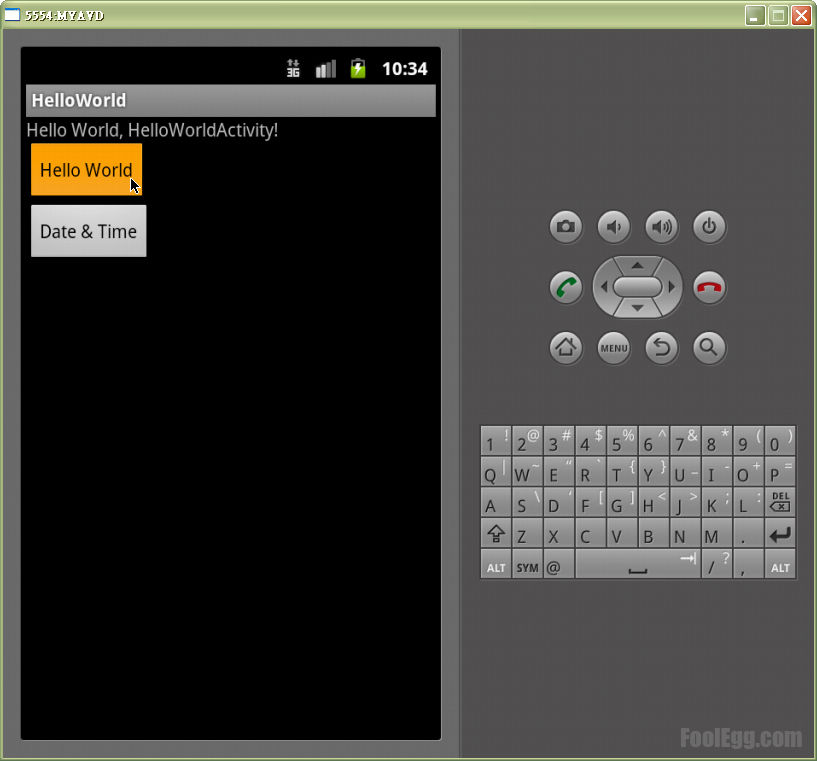
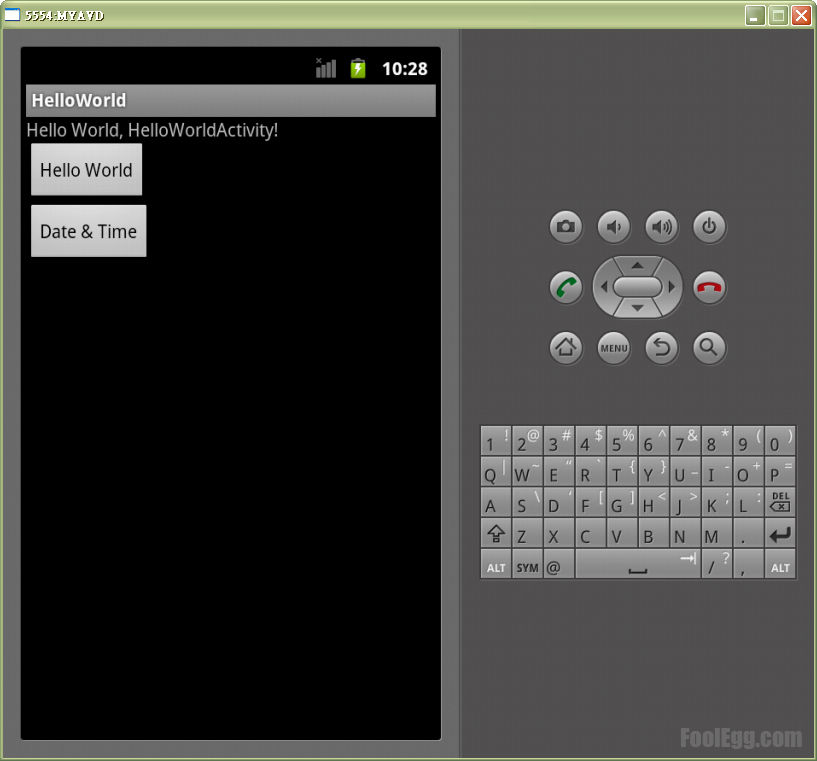
第一次執行 Android 的模擬器會比較慢,最耐心等待。正常來說,模擬器載入後會啟動「Hello World」程序。
-
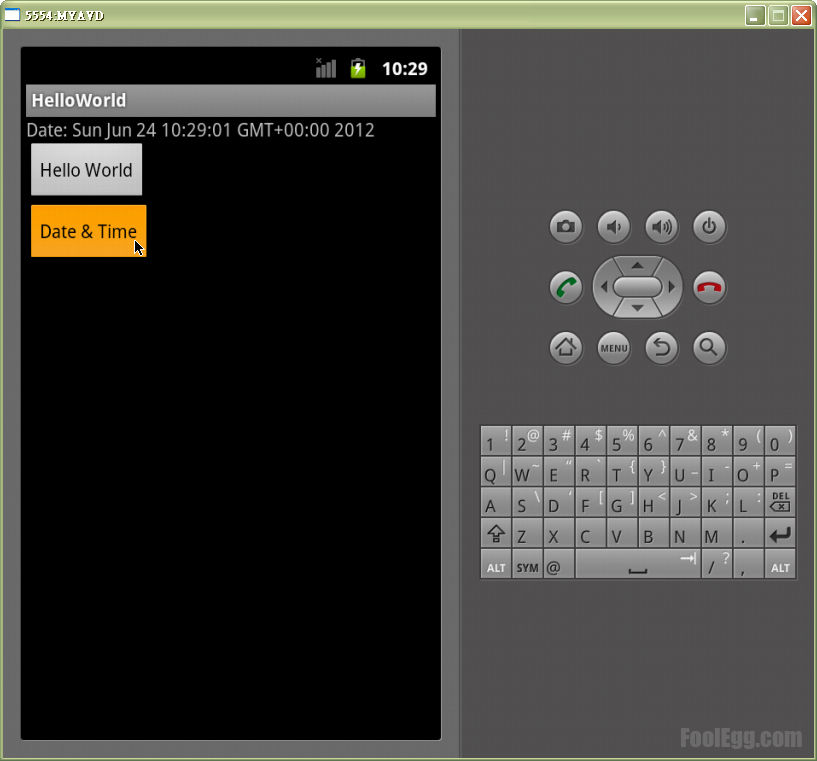
點擊「Date & Time」按鈕,程序會顯示當前的時間。
-
點擊「Hello World」按鈕,程序會顯示預設的字串。